-
데이터 로딩과 저장, 파일 형식Python 2023. 11. 20. 17:15
데이터 로딩(data loading)은 데이터를 읽고 접근 가능하도록 하는 작업, 데이터 분석에서의 도구를 사용하는 첫 번째 단계
유사한 용어인 파싱(parsing)(구문 분석)은 텍스트 데이터를 불러와 표나 다른 데이터 형식으로 해석하는 과정
텍스트 파일에서 데이터를 읽고 쓰는 법
In [1]: !cat ex1.csv
'cat'은(는) 내부 또는 외부 명령, 실행할 수 있는 프로그램, 또는
배치 파일이 아닙니다.

In [2]: !type ex1.csv
a,b,c,d,message
1,2,3,4,hello
5,6,7,8,world
9,10,11,12,foo
유닉스의 cat 명령어를 통해 파일 내용 확인, 윈도우 사용자는 type 명령어로 확인 가능

자동으로 제일 위에 있는 열이 열 이름으로 들어감
In [7]: !type ex2.csv
1,2,3,4,hello
5,6,7,8,world
9,10,11,12,foo
In [8]: pd.read_csv('ex2.csv')
Out[8]:
   1   2   3   4  hello
0  5   6   7   8  world
1  9  10  11  12    foo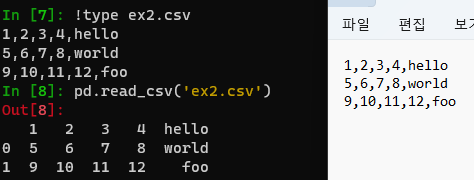
In [9]: pd.read_csv('ex2.csv', header=None)    # 헤더 행 x
Out[9]:
   0   1   2   3      4
0  1   2   3   4  hello
1  5   6   7   8  world
2  9  10  11  12    foo

In [10]: pd.read_csv('ex2.csv', names=['a', 'b', 'c', 'd', 'message'])    # 헤더 직접 지정
Out[10]:
   a   b   c   d message
0  1   2   3   4   hello
1  5   6   7   8   world
2  9  10  11  12     foo
message 열을 인덱스로 하는 DataFrame을 반환하고 싶은 경우
index_col 인수의 4번째 열 또는 'message' 이름 가진 열을 직접 지정해 인덱스로 만들 수 있음
In [11]: names = ['a', 'b', 'c', 'd', 'message']

In [12]: pd.read_csv('ex2.csv', names=names, index_col='message')
Out[12]:
         a   b   c   d
message
hello    1   2   3   4
world    5   6   7   8
foo      9  10  11  12
계층적 인덱스를 지정하고 싶다면 열 번호나 이름의 리스트를 넘기면 됨
In [16]: !type csv_mindex.csv
key1,key2,value1,value2
one,a,1,2
one,b,3,4
one,c,5,6
one,d,7,8
two,a,9,10
two,b,11,12
two,c,13,14
two,d,15,16

In [17]: parsed = pd.read_csv('csv_mindex.csv',
    ...:                      index_col=['key1', 'key2'])

In [18]: parsed
Out[18]:
           value1  value2
key1 key2
one  a          1       2
     b          3       4
     c          5       6
     d          7       8
two  a          9      10
     b         11      12
     c         13      14
     d         15      16
가끔 고정된 구분자(delimiter) 없이 공백이나 다른 패턴으로 필드를 구분해놓은 경우 해결 법
직접 파일 고치지 않고 정규 표현식 \s+ 사용해 처리
In [19]: !type ex3.txt
            A         B         C
aaa -0.264438 -1.026059 -0.619500
bbb  0.927272  0.302904 -0.032399
ccc -0.264273 -0.386314 -0.217601
ddd -0.871858 -0.348382  1.100491

In [20]: result = pd.read_csv('ex3.txt', sep='\s+')

In [21]: result
Out[21]:
            A         B         C
aaa -0.264438 -1.026059 -0.619500
bbb  0.927272  0.302904 -0.032399
ccc -0.264273 -0.386314 -0.217601
ddd -0.871858 -0.348382  1.100491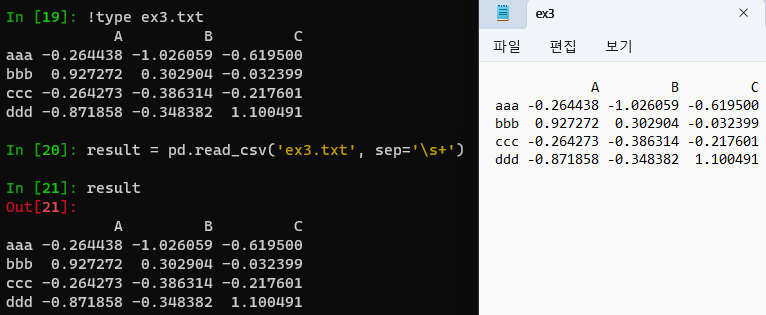
파싱 함수는 파일 형식에서 발생할 수 있는 다양한 예외를 처리할 수 있또록 추가 인수를 가지고 있음
skiprows를 이용해 첫 번째, 세 번째, 네 번째 행 건너뛰기
In [22]: !type ex4.csv
# hey!
a,b,c,d,message
# just wanted to make things more difficult for you
# who reads CSV files with computers, anyway?
1,2,3,4,hello
5,6,7,8,world
9,10,11,12,foo

In [23]: pd.read_csv('ex4.csv', skiprows=[0, 2, 3])
Out[23]:
   a   b   c   d message
0  1   2   3   4   hello
1  5   6   7   8   world
2  9  10  11  12     foo

In [24]: pd.read_csv('ex4.csv')
Out[24]:
                                                                      # hey!
a                                                  b        c   d    message
# just wanted to make things more difficult for... NaN      NaN NaN      NaN
# who reads CSV files with computers                anyway? NaN NaN      NaN
1                                                  2        3   4      hello
5                                                  6        7   8      world
9                                                  10       11  12       foo
In [27]: !type ex5.csv something,a,b,c,d,message one,1,2,3,4,NA two,5,6,,8,world three,9,10,11,12,foo In [28]: result = pd.read_csv('ex5.csv') In [29]: result Out[29]: something a b c d message 0 one 1 2 3.0 4 NaN 1 two 5 6 NaN 8 world 2 three 9 10 11.0 12 foo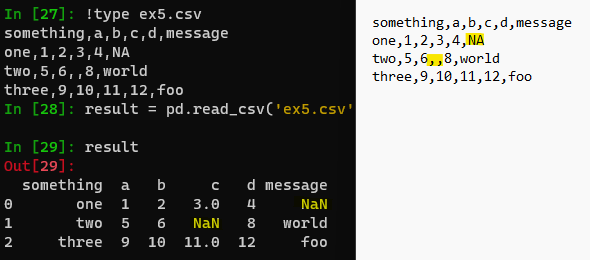
비어 있는 공간에 공백 문자 넣을 경우 NaN이 아닌 공백으로 처리
In [30]: !type ex5.csv
something,a,b,c,d,message
one,1,2,3,4,NA
two,5,6, ,8,world
three,9,10,11,12,foo
In [31]: result = pd.read_csv('ex5.csv')

In [32]: result
Out[32]:
  something  a   b   c   d message
0       one  1   2   3   4     NaN
1       two  5   6       8   world
2     three  9  10  11  12     foo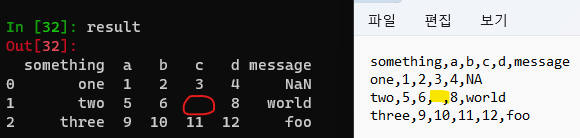
아무것도 존재하지 않는 상태 null
NA = 값은 존재하지만 처리하지 않음, 결측치
In [36]: pd.isna(result)    # 누락된 값을 NaN으로 출력하므로 2개의 null 또는 누락된 값 존재
Out[36]:
   something      a      b      c      d  message
0      False  False  False  False  False     True
1      False  False  False   True  False    False
2      False  False  False  False  False    False

# na_values 옵션은 문자열 집합을 받아 누락된 값을 처리
In [37]: result = pd.read_csv('ex5.csv', na_values=['NULL'])

In [38]: result
Out[38]:
  something  a   b     c   d message
0       one  1   2   3.0   4     NaN
1       two  5   6   NaN   8   world
2     three  9  10  11.0  12     foo
pandas.read_csv에는 다양한 기본 NA 값 표현 목록이 있지만 keep_default_na 옵션으로 비활성화할 수 있음
In [39]: result2 = pd.read_csv('ex5.csv', keep_default_na=False)

In [40]: result2
Out[40]:
  something  a   b   c   d message
0       one  1   2   3   4      NA
1       two  5   6       8   world
2     three  9  10  11  12     foo

In [41]: result2.isna()
Out[41]:
   something      a      b      c      d  message
0      False  False  False  False  False    False
1      False  False  False  False  False    False
2      False  False  False  False  False    False

In [42]: result3 = pd.read_csv('ex5.csv', keep_default_na=False,
    ...:                       na_values=['NA'])

In [43]: result3
Out[43]:
  something  a   b   c   d message
0       one  1   2   3   4     NaN
1       two  5   6       8   world
2     three  9  10  11  12     foo

In [44]: result3.isna()
Out[44]:
   something      a      b      c      d  message
0      False  False  False  False  False     True
1      False  False  False  False  False    False
2      False  False  False  False  False    False
열마다 다른 NA 문자를 딕셔너리 값으로 넘겨 처리할 수 있음
In [45]: sentinels = {'message': ['foo', 'NA'], 'something': ['two']}

In [46]: pd.read_csv('ex5.csv', na_values=sentinels,
    ...:             keep_default_na=False)
Out[46]:
  something  a   b   c   d message
0       one  1   2   3   4     NaN
1       NaN  5   6       8   world
2     three  9  10  11  12     NaN
pandas.read_csv 함수 인수들 필요할 때 찾아볼 것
텍스트 파일 조금씩 읽어 오기
In [50]: pd.options.display.max_rows = 10    # 생략해도 최근 버전은 앞 5행, 뒤 5행씩 보여줌

In [51]: result = pd.read_csv('ex6.csv')

In [52]: result
Out[52]:
           one       two     three      four key
0     0.467976 -0.038649 -0.295344 -1.824726   L
1    -0.358893  1.404453  0.704965 -0.200638   B
2    -0.501840  0.659254 -0.421691 -0.057688   G
3     0.204886  1.074134  1.388361 -0.982404   R
4     0.354628 -0.133116  0.283763 -0.837063   Q
...        ...       ...       ...       ...  ..
9995  2.311896 -0.417070 -1.409599 -0.515821   L
9996 -0.479893 -0.650419  0.745152 -0.646038   E
9997  0.523331  0.787112  0.486066  1.093156   K
9998 -0.362559  0.598894 -1.843201  0.887292   G
9999 -0.096376 -1.012999 -0.657431 -0.573315   0

[10000 rows x 5 columns]
말줄임표(...)는 DataFrame 중간 행이 생략되었다는 뜻
In [53]: pd.read_csv('ex6.csv', nrows=5)    # nrows 옵션: 처음 n 행만 읽기
Out[53]:
        one       two     three      four key
0  0.467976 -0.038649 -0.295344 -1.824726   L
1 -0.358893  1.404453  0.704965 -0.200638   B
2 -0.501840  0.659254 -0.421691 -0.057688   G
3  0.204886  1.074134  1.388361 -0.982404   R
4  0.354628 -0.133116  0.283763 -0.837063   Q

# chunksize 옵션: 여러 조각으로 나누어 읽기
In [54]: chunker = pd.read_csv('ex6.csv', chunksize=1000)

In [55]: type(chunker)
Out[55]: pandas.io.parsers.readers.TextFileReader
pandas.read_csv에서 반환된 TextFileReader 객체를 사용하면 chunksize 단위로 파일을 순회할 수 있음
ex) ex6.csv 파일을 순회하면서 'key' 열의 값을 세는 작업
In [55]: type(chunker)
Out[55]: pandas.io.parsers.readers.TextFileReader

In [56]: tot = pd.Series([], dtype='int64')    # 여기서 tot는 total의 의미

In [57]: for piece in chunker:
    ...:     tot = tot.add(piece['key'].value_counts(), fill_value=0)
    ...:

In [58]: tot = tot.sort_values(ascending=False)

In [59]: tot[:10]
Out[59]:
key
E    368.0
X    364.0
L    346.0
O    343.0
Q    340.0
M    338.0
J    337.0
F    335.0
K    334.0
H    330.0
dtype: float64
TextFileReader는 임의의 크기만큼 데이터를 읽을 수 있는 get_chunk 메서드도 제공
데이터를 텍스트 형식으로 기록
In [60]: data = pd.read_csv('ex5.csv')

In [61]: data
Out[61]:
  something  a   b     c   d message
0       one  1   2   3.0   4     NaN
1       two  5   6   NaN   8   world
2     three  9  10  11.0  12     foo

In [62]: # DataFrame의 to_csv 메서드로 데이터를 쉼표로 구분된 형식으로 파일에 쓸 수 있음

In [63]: data.to_csv('out.csv')

In [64]: !type out.csv
,something,a,b,c,d,message
0,one,1,2,3.0,4,
1,two,5,6,,8,world
2,three,9,10,11.0,12,foo

In [65]: data.to_csv('out.csv', header=False)

In [66]: !type out.csv    # 위 모든 열이 날아감
0,one,1,2,3.0,4,
1,two,5,6,,8,world
2,three,9,10,11.0,12,foo

In [67]: import sys

In [68]: data.to_csv(sys.stdout, sep='|')
|something|a|b|c|d|message
0|one|1|2|3.0|4|
1|two|5|6||8|world
2|three|9|10|11.0|12|foo

# 결과에서 누락된 값은 비어 있는 문자열로 나타남, 원하는 값으로 지정 가능
In [69]: data.to_csv(sys.stdout, na_rep='NULL')
,something,a,b,c,d,message
0,one,1,2,3.0,4,NULL
1,two,5,6,NULL,8,world
2,three,9,10,11.0,12,foo

# 행렬 이름 포함하지 않는 옵션
In [70]: data.to_csv(sys.stdout, index=False, header=False)
one,1,2,3.0,4,
two,5,6,,8,world
three,9,10,11.0,12,foo

In [71]: data
Out[71]:
  something  a   b     c   d message
0       one  1   2   3.0   4     NaN
1       two  5   6   NaN   8   world
2     three  9  10  11.0  12     foo

# 72, 73은 리스트 표현 방식에만 차이를 둠
# 열의 일부분만 기록할 수도 있고, 순서 직접 지정 가능
In [72]: data.to_csv( sys.stdout, index=False, columns=list('abc') )
a,b,c
1,2,3.0
5,6,
9,10,11.0

In [73]: data.to_csv( sys.stdout, index=False, columns=['a', 'b', 'c'] )
a,b,c
1,2,3.0
5,6,
9,10,11.0
다른 구분자 형식 다루기
기본적인 도구 사용법 익히기
In [74]: !type ex7.csv
"a","b","c"
"1","2","3"
"1","2","3"

# 구분자가 한 글자인 파일은 파이썬 내장 csv 모듈을 이용해 처리할 수 있음
# > 열린 파일 객체를 csv.reader 함수에 넘김
In [75]: import csv

In [76]: f = open('ex7.csv')

In [77]: reader = csv.reader(f)

In [78]: for line in reader:
    ...:     print(line)
    ...:
['a', 'b', 'c']
['1', '2', '3']
['1', '2', '3']

In [79]: f.close()
원하는 형태로 데이터 넣기 연습
#  파일을 읽어 줄 단위 리스트로 저장
In [84]: with open('ex7.csv') as f:    # f 혹은 file
    ...:     lines = list(csv.reader(f))
    ...:

In [85]: lines[0]
Out[85]: ['a', 'b', 'c']

In [86]: lines[1]
Out[86]: ['1', '2', '3']

In [87]: header, values = lines[0], lines[1:]

In [88]: header, values
Out[88]: (['a', 'b', 'c'], [['1', '2', '3'], ['1', '2', '3']])

# 딕셔너리 표기법과 행을 열로 전치해주는 zip(*values) 이용해 열 딕셔너리 만들기
# (큰 파일에서는 메모리를 많이 사용하므로 유의할 것)
In [89]: data_dict = {h: v for h, v in zip(header, zip(*values))}

In [90]: data_dict
Out[90]: {'a': ('1', '1'), 'b': ('2', '2'), 'c': ('3', '3')}
In [96]: f = open('ex7.csv') In [97]: class my_dialect(csv.Dialect): ...: lineterminator = '\n' ...: delimiter = ';' ...: quotechar = '"' ...: quoting = csv.QUOTE_MINIMAL ...: In [98]: reader = csv.reader(f, dialect=my_dialect) In [99]: reader = csv.reader(f, delimiter='|') In [100]: with open('mydata.csv', 'w') as f: ...: writer = csv.writer(f, dialect=my_dialect) ...: writer.writerow(('one', 'two', 'three')) ...: writer.writerow(('1', '2', '3')) ...: writer.writerow(('4', '5', '6')) ...: writer.writerow(('7', '8', '9'))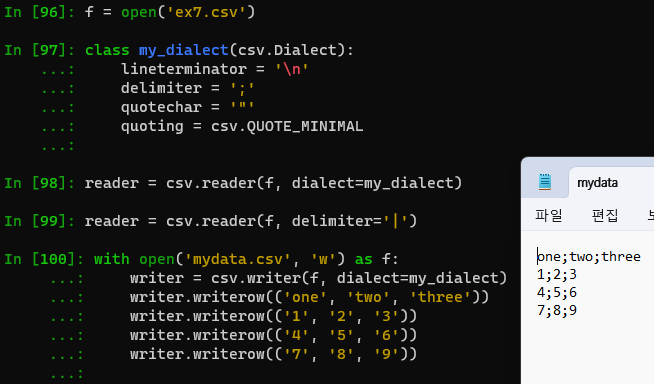
JSON 데이터
JSON(JavaScript Object Notation): 웹 브라우저와 다른 애플리케이션이 HTTP 요청으로 데이터를 보낼 때 사용하는 표준 파일 형식 중 하나
JSON은 CSV 같은 표 형식의 텍스트보다 유연한 데이터 형식
JSON 데이터 예시
In [114]: obj = """
     ...: {"name": "Wes",
     ...:  "cities_lived": ["Akron", "Nashville", "New York", "San Francisco"],
     ...:  "pet": null,
     ...:  "siblings": [{"name": "Scott", "age": 34, "hobbies": ["guitars", "soccer"]},
     ...:               {"name": "Katie", "age": 42, "hobbies": ["diving", "art"]}]
     ...: }
     ...: """
널 값인 null과 다른 몇 가지 사소한 차이(리스트 마지막에 쉼표가 있으면 안 됨 등)를 제외하면 파이썬 코드와 유사
기본 자료형은 객체(딕셔너리), 배열(리스트), 문자열, 숫자, 불리언, 널이며 객체의 키는 반드시 문자열이어야 함
In [115]: import json

# JSON 문자열 파이썬 형태로 변환할 때 json.loads 사용
In [116]: result = json.loads(obj)

In [117]: result
Out[117]:
{'name': 'Wes',
 'cities_lived': ['Akron', 'Nashville', 'New York', 'San Francisco'],
 'pet': None,
 'siblings': [{'name': 'Scott', 'age': 34, 'hobbies': ['guitars', 'soccer']},
  {'name': 'Katie', 'age': 42, 'hobbies': ['diving', 'art']}]}

# json.dumps는 파이썬 객체를 JSON 형태로 변환
In [118]: asjson = json.dumps(result)

In [119]: asjson
Out[119]: '{"name": "Wes", "cities_lived": ["Akron", "Nashville", "New York", "San Francisco"], "pet": null, "siblings": [{"name": "Scott", "age": 34, "hobbies": ["guitars", "soccer"]}, {"name": "Katie", "age": 42, "hobbies": ["diving", "art"]}]}'
In [120]: result['siblings'] Out[120]: [{'name': 'Scott', 'age': 34, 'hobbies': ['guitars', 'soccer']}, {'name': 'Katie', 'age': 42, 'hobbies': ['diving', 'art']}] In [121]: siblings = pd.DataFrame(result['siblings'], columns=['name', 'age']) In [122]: siblings Out[122]: name age 0 Scott 34 1 Katie 42 In [123]: siblings = pd.DataFrame(result['siblings']) In [124]: siblings Out[124]: name age hobbies 0 Scott 34 [guitars, soccer] 1 Katie 42 [diving, art] In [125]: In [125]: !type example.json [{"a": 1, "b": 2, "c": 3}, {"a": 4, "b": 5, "c": 6}, {"a": 7, "b": 8, "c": 9}] In [126]: data = pd.read_json('example.json') In [127]: data Out[127]: a b c 0 1 2 3 1 4 5 6 2 7 8 9 In [128]: data.to_json(sys.stdout) {"a":{"0":1,"1":4,"2":7},"b":{"0":2,"1":5,"2":8},"c":{"0":3,"1":6,"2":9}} In [129]: data.to_json(sys.stdout, orient='records') [{"a":1,"b":2,"c":3},{"a":4,"b":5,"c":6},{"a":7,"b":8,"c":9}]이진 데이터 형식
데이터를 이진 형식으로 저장(또는 직렬화(serialize))하는 가장 간단한 방법은 파이썬 내장 pickle 모듈을 이용하는 것
판다스 객체는 pickle 형식으로 데이터를 디스크에 저장할 수 있는 to_pickle 메서드를 제공
In [133]: frame = pd.read_csv('ex1.csv')

In [134]: frame
Out[134]:
   a   b   c   d message
0  1   2   3   4   hello
1  5   6   7   8   world
2  9  10  11  12     foo

In [135]: import pickle

In [136]: frame.to_pickle('frame_pickle')

In [137]: pd.read_pickle('frame_pickle')
Out[137]:
   a   b   c   d message
0  1   2   3   4   hello
1  5   6   7   8   world
2  9  10  11  12     foo
마이크로소프트 엑셀 파일 읽기
판다스는 pandas.ExcelFile 클래스나 pandas.read_excel 함수를 통해 엑셀 2003 이후 버전으로 저장된 표 형식 데이터를 읽을 수 있음
내부적으로 xlrd 패키지와 openpyxl 패키지를 이용해 이전 형식의 xls 파일과 새로운 형식의 xlsx 파일을 읽을 수 있음
> 두 패키지는 판다스와 별개로 pip이나 conda 명령을 통해 따로 설치
In [1]: !pip install openpyxl xlrd    # ipython 내에서 명령어 칠 때 '!' 포함
C:\Users\User\anaconda3\Lib\site-packages\IPython\core\interactiveshell.py:2622: UserWarning: You executed the system command !pip which may not work as expected. Try the IPython magic %pip instead.
  warnings.warn(
Collecting openpyxl
  Downloading openpyxl-3.1.2-py2.py3-none-any.whl (249 kB)
     ━━━━━━━━━━━━━━━━━━━━━━━━━━━━━━━━━━━━━━━━ 250.0/250.0 kB 15.0 MB/s eta 0:00:00
Collecting xlrd
  Downloading xlrd-2.0.1-py2.py3-none-any.whl (96 kB)
     ━━━━━━━━━━━━━━━━━━━━━━━━━━━━━━━━━━━━━━━━ 96.5/96.5 kB ? eta 0:00:00
Collecting et-xmlfile (from openpyxl)
  Downloading et_xmlfile-1.1.0-py3-none-any.whl (4.7 kB)
Installing collected packages: xlrd, et-xmlfile, openpyxl
Successfully installed et-xmlfile-1.1.0 openpyxl-3.1.2 xlrd-2.0.1
In [8]: xlsx = pd.ExcelFile('ex1.xlsx') In [9]: xlsx Out[9]: <pandas.io.excel._base.ExcelFile at 0x272610f0050> # 해당 파일에서 이용 가능한 시트 이름 목록 표시 In [10]: xlsx.sheet_names Out[10]: ['Sheet1'] # DataFrame으로 읽어오기 In [11]: xlsx.parse(sheet_name='Sheet1') Out[11]: Unnamed: 0 a b c d message 0 0 1 2 3 4 hello 1 1 5 6 7 8 world 2 2 9 10 11 12 foo # 엑셀 표에 인덱스 열이 존재하므로 index_col을 사용해 인수 지정 가능 In [12]: xlsx.parse(sheet_name='Sheet1', index_col=0) Out[12]: a b c d message 0 1 2 3 4 hello 1 5 6 7 8 world 2 9 10 11 12 foo데이터베이스와 함께 사용
판다스는 SQL 쿼리 결과를 간단하게 DataFrame으로 불러오는 함수 몇 가지를 제공
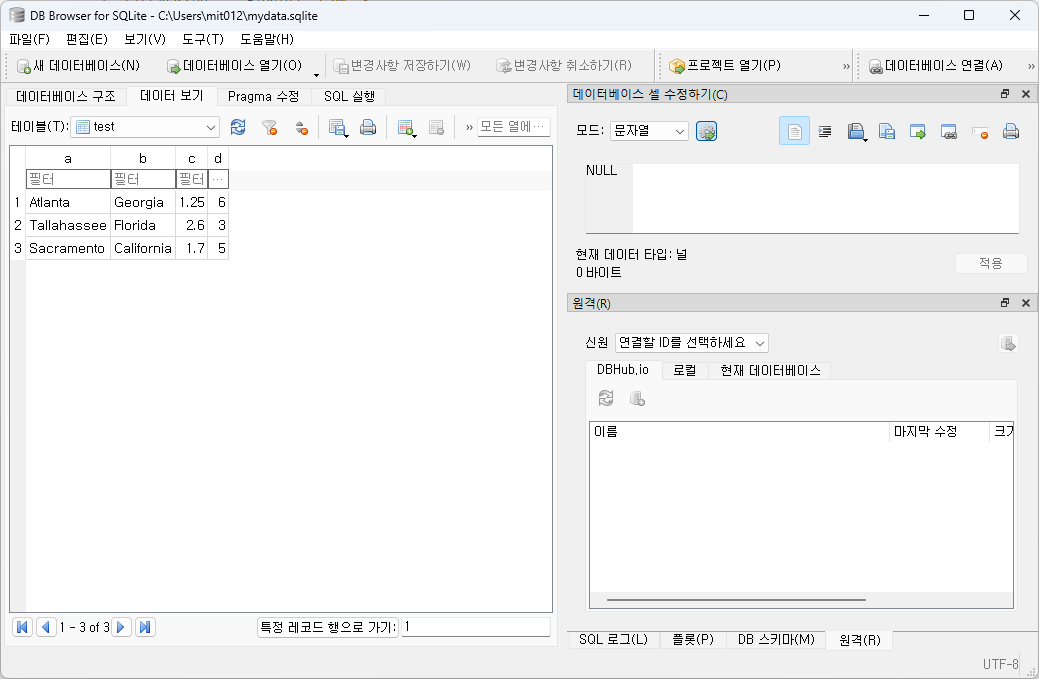
파이썬 내장 sqlite3 드라이버를 이용해 SQLite3 데이터베이스 만들기
In [2]: import sqlite3

In [3]: query = """
   ...: CREATE TABLE test
   ...: (a VARCHAR(20), b VARCHAR(20),
   ...:  c REAL,        d INTEGER
   ...: );"""

In [4]: con = sqlite3.connect('mydata.sqlite')

In [5]: con.execute(query)
Out[5]: <sqlite3.Cursor at 0x22127a09440>

In [6]: con.commit()

#데이터 입력
In [7]: data = [('Atlanta', 'Georgia', 1.25, 6),
   ...:         ('Tallahassee', 'Florida', 2.6, 3),
   ...:         ('Sacramento', 'California', 1.7, 5)]

In [8]: stmt = 'INSERT INTO test VALUES(?, ?, ?, ?)'

In [9]: con.executemany(stmt, data)
Out[9]: <sqlite3.Cursor at 0x2212506fec0>

In [10]: con.commit()

# 대부분의 파이썬 SQL 드라이버는 테이블에서 select 쿼리를 수행하면 튜플 리스트 반환
In [11]: cursor = con.execute('SELECT * FROM test')

In [12]: rows = cursor.fetchall()

In [13]: rows
Out[13]:
[('Atlanta', 'Georgia', 1.25, 6),
 ('Tallahassee', 'Florida', 2.6, 3),
 ('Sacramento', 'California', 1.7, 5)]

# cursor의 description 속성에 있는 열 이름 지정
In [14]: cursor.description
Out[14]:
(('a', None, None, None, None, None, None),
 ('b', None, None, None, None, None, None),
 ('c', None, None, None, None, None, None),
 ('d', None, None, None, None, None, None))

In [15]: pd.DataFrame(rows, columns=[x[0] for x in cursor.description])
Out[15]:
             a           b     c  d
0      Atlanta     Georgia  1.25  6
1  Tallahassee     Florida  2.60  3
2   Sacramento  California  1.70  5
유명한 파이썬 SQL 툴킷(toolkit)인 SQLAlchemy 프로젝트는 SQL 데이터베이스 간의 일반적인 차이점을 추상화해 제공
판다스는 read_sql 함수를 통해 SQLAlchemy의 일반적인 연결을 이용해 쉽게 데이터를 읽도록 지원
# 설치 필요, pip 혹은 conda 설치 In [19]: !pip install sqlalchemy In [20]: import sqlalchemy as sqla In [21]: db = sqla.create_engine('sqlite:///mydata.sqlite') In [22]: pd.read_sql('SELECT * FROM test', db) Out[22]: a b c d 0 Atlanta Georgia 1.25 6 1 Tallahassee Florida 2.60 3 2 Sacramento California 1.70 5Downloads - DB Browser for SQLite
(Please consider sponsoring us on Patreon 😄) Windows Our latest release (3.12.2) for Windows: Windows PortableApp Note - If for any reason the standard Windows release does not work (e.g. gives an error), try a nightly build (below). Nightly builds ofte
sqlitebrowser.org
zip 파일 다운로드 - 압축 풀기 - DB Browser for SQLite 실행


'Python' 카테고리의 다른 글
데이터 준비: 조인, 병합, 변형 (0) 2023.11.27 데이터 정제 및 준비 (0) 2023.11.21 판다스 (0) 2023.11.14 넘파이 기본: 배열과 벡터 연산 (0) 2023.11.07 파이썬 기초와 Ipython, jupyter notebook (0) 2023.10.31